 Kia Soul: Crankshaft Disassembly
Kia Soul 2014-2019 PS Service Manual / Engine Mechanical System / Cylinder Block / Crankshaft Disassembly
|
|
| 1. |
Remove the engine and transaxle assembly from the vehicle.
(Refer to Engine and Transaxle Assembly - "Engine and Transaxle
Assembly")
|
| 2. |
Remove the transaxle assembly from the engine assembly.
|
| 3. |
Remove the drive plate or flywheel.
|
| 4. |
Remove the rear oil seal.
(Refer to Cylinder Block Assembly - "Rear Oil Seal")
|
| 5. |
Install the engine assembly to engine stand for disassembly.
|
| 6. |
Remove the intake manifold.
(Refer to Intake And Exhaust System - "Intake Manifold")
|
| 7. |
Remove the exhaust manifold.
(Refer to Intake And Exhaust System - "Exhaust Manifold")
|
| 8. |
Remove the timing chain.
(Refer to Timing System - "Timing Chain")
|
| 9. |
Remove the cylinder head assembly.
(Refer to Cylinder Head Assembly - "Cylinder Head")
|
| 10. |
Remove the oil filter.
(Refer to Lubrication System - "Oil Filter")
|
| 11. |
Remove the oil pan and the oil screen.
(Refer to Lubrication System - "Oil Pan")
|
| 12. |
Remove the ladder frame (A).
|
| 13. |
Remove the piston and connecting rod assembly.
(Refer to Cylinder Block Assembly - "Piston and Connecting Rod")
|
| 14. |
Check the main bearing oil clearance.
|
| 15. |
Remove the main bearing caps (A).
|
| 16. |
Check the crankshaft end play.
|
| 17. |
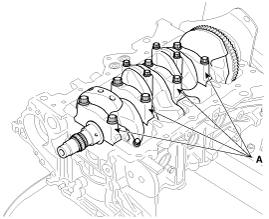
Lift the crankshaft (A) out of the cylinder block, being careful
not to damage journals.
|
| 18. |
Remove the CKPS wheel (A) from the crankshaft.
|
 Crankshaft Components
1. Crankshaft sprocket s
2. Crankshaft thrust bearing
3. Crankshaft upper main bearing
4. Crankshaft
5. CKPS wheel
6. Crankshaft lower main bearing
7. Crankshaft ma ...
 Crankshaft Inspection
1.
Check the crankshaft main bearing oil clearance.
(1)
To check main bearing-to-journal oil clearance, remove
the bearing caps with ...
See also:
Component Location
1. Back view camera
2. Audio/AVN head unit
...
To keep locks from freezing
To keep the locks from freezing, squirt an approved de-icer fluid or glycerine
into the key opening. If a lock is covered with ice, squirt it with an approved
de-icing fluid to remove the ice. If ...
SOUND SETTINGS
Press the
key
Select
[Sound] through
TUNE knob or
key
Select menu through
TUNE knob
...


